How To Install MySQL In Windows 10
By Tech-Act
04/16/2024 8817 Views
Introduction to MySQL:
- Do you know how My SQL name was formed? Well, if you look at it carefully it is a combination of two names i.e. “My” it is the name of the co-founder Michael Widenius’s daughter and “SQL” is the full form of Structured Query Language. MySQL is one of the most popular open-source database management systems. It is easy to use, reliable, and fast. MySQL is a database management system that works on embedded systems as well as client-server systems.
- Have you thought what makes MySQL so popular? MySQL is an open-source. It is used at a large scale hence a lot of code is readily available. Entire developed systems are also available which can be referred for the future projects. MySQL has relational databases therefore methodical storage is possible. It is also quick and robust.
Below are the topic & Steps we’ll follow in this article
- What is the MySQL Installer?
- Step 1: Download the latest MySQL community server.
- Step 2: Select MySQL installer community.
- Step 3: Download the .msi file.
- Step 4: Visit the download folder.
- Step 5: Windows will begin the configuration process.
- Step 6: License agreement will be displayed.
- Step 7: Setting up different types of MySQL installations.
- Step 8: Product requirements.
- Step 9: Click on Execute.
- Step 10: Execute the product installation process.
- Step 11: Configure the server.
- Step 12: Select the modes
- Step 14: Development Computer Option.
- Step 15: Select the authentication method
- Step 16: Set MySQL root user password.
- Step 17: Add User button.
- Step 18: Let the service details be as default
- Step 19: Apply for the configurations
- Step 20: Click on Finish button to get your MySQL on your Windows 10.
What is the MySQL Installer?
- MySQL installer can be easily installed if it is supported by the Wizard.
- A simple to use wizard is provided by MySQL which aids the users to install MySQL with the elements like MySQL Server, All Available Connectors, MySQL Workbench, MySQL Notifier, Tools for excel and Microsoft visual Studio, MySQL Sample Databases.
Today, in this article we have explained in detail how to install MySQL in windows 10. Here are the various steps required for installing MySQL on Windows 10.
Step 1
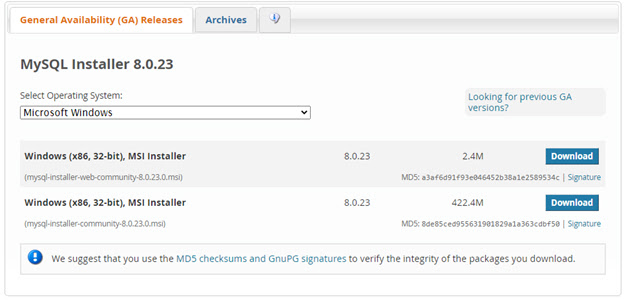
- The first step is to download the latest MySQL community server from the official website of MySQL. The version at my end is 8.0.12, but even if the version is different for you still the installation process will be same.
- By visiting the above mentioned website, you will see the options. Then, you have to select the OS as Microsoft windows and click on Go to Download page.
- This will take you to the actual download page for windows MySQL server.
Step 3
- Then MySQL credentials will be asked to download the .msi file. If your credentials are available then you can simply log in or if you want to sign up then go to green colored signup button and click it.
- You also have the option to skip this step of login & signup by directly clicking on No thanks, just start my download option. And the downloading will begin on your local machine.
Conclusion
So, now follow the above mentioned steps to quickly Install MySQL in windows 10. Hope, this article was useful!
All the best!!
Introduction to MySQL:
- Do you know how My SQL name was formed? Well, if you look at it carefully it is a combination of two names i.e. “My” it is the name of the co-founder Michael Widenius’s daughter and “SQL” is the full form of Structured Query Language. MySQL is one of the most popular open-source database management systems. It is easy to use, reliable, and fast. MySQL is a database management system that works on embedded systems as well as client-server systems.
- Have you thought what makes MySQL so popular? MySQL is an open-source. It is used at a large scale hence a lot of code is readily available. Entire developed systems are also available which can be referred for the future projects. MySQL has relational databases therefore methodical storage is possible. It is also quick and robust.
Below are the topic & Steps we’ll follow in this article
- What is the MySQL Installer?
- Step 1: Download the latest MySQL community server.
- Step 2: Select MySQL installer community.
- Step 3: Download the .msi file.
- Step 4: Visit the download folder.
- Step 5: Windows will begin the configuration process.
- Step 6: License agreement will be displayed.
- Step 7: Setting up different types of MySQL installations.
- Step 8: Product requirements.
- Step 9: Click on Execute.
- Step 10: Execute the product installation process.
- Step 11: Configure the server.
- Step 12: Select the modes
- Step 14: Development Computer Option.
- Step 15: Select the authentication method
- Step 16: Set MySQL root user password.
- Step 17: Add User button.
- Step 18: Let the service details be as default
- Step 19: Apply for the configurations
- Step 20: Click on Finish button to get your MySQL on your Windows 10.
What is the MySQL Installer?
- MySQL installer can be easily installed if it is supported by the Wizard.
- A simple to use wizard is provided by MySQL which aids the users to install MySQL with the elements like MySQL Server, All Available Connectors, MySQL Workbench, MySQL Notifier, Tools for excel and Microsoft visual Studio, MySQL Sample Databases.
Today, in this article we have explained in detail how to install MySQL in windows 10. Here are the various steps required for installing MySQL on Windows 10.
Step 1
- The first step is to download the latest MySQL community server from the official website of MySQL. The version at my end is 8.0.12, but even if the version is different for you still the installation process will be same.
- By visiting the above mentioned website, you will see the options. Then, you have to select the OS as Microsoft windows and click on Go to Download page.
- This will take you to the actual download page for windows MySQL server.
Step 3
- Then MySQL credentials will be asked to download the .msi file. If your credentials are available then you can simply log in or if you want to sign up then go to green colored signup button and click it.
- You also have the option to skip this step of login & signup by directly clicking on No thanks, just start my download option. And the downloading will begin on your local machine.
Conclusion
So, now follow the above mentioned steps to quickly Install MySQL in windows 10. Hope, this article was useful!
All the best!!